CLICK HERE FOR FREE BLOGGER TEMPLATES, LINK BUTTONS AND MORE! »

Pages

Saturday, July 31, 2010

One Lonely Wedding Picture

Last Thursday, I went thrifting...Thrifty Thursday! A fellow thrifty shopper and I hit three Goodwills and a furniture consignment shop. Usually when I go on a thrifting spree, I just look for things I think I could use, repurpose, or just make purty. Not on this trip. I had a rhyme and reason! I was looking for a frame to put one of my favorite wedding pictures in.


This picture has needed a home for almost a year and a half now. I cannot express how much I love, love, love this picture. My favorite people having a great time! So, I loaded it up in the car with me and off to find a frame we went.

I found this frame at the second Goodwill we visited. I knew it would be perfect! I was looking for chunky, and this guy was chuunnkkkyy! I was not a fan of the lovely gold color, but that's no problem my best friend, ORB, couldn't fix. The picture is definitely not my taste either, but I knew I could make my own matting out of it. So, I proudly took it to the check out counter and paid $7.50. Woot! Woot!

I also found these lovelies during the trip. I knew I could use these somewhere in the Master Bedroom.


The gears started turning...DANGER...DANGER!!! I had a shelf at home that I found at a Salvation Army, and I thought it would look great under the picture. Adding some of the accessories I found and some shells I already had would complete the beachy feel.


This shell picture frame and jar cost me a whopping 50 cents each.

Here is how it turned out. Altogether, I only spent $13.50 on the WHOLE display, excluding the shells that I had left over from another bedroom project. Swoon!!!
I am so glad this picture isn't tucked away in a closet anymore, and I can enjoy it everyday.
P.S. My camera does not cooperate well with daylight, so the picture had to be taken from the side to prevent a glare.

Tuesday, July 27, 2010

Transformation Tuesday #1

I thought I would dedicate Tuesdays to transformations. One of my favorite things to do around our house is take something outdated, or just plain ol' U.G.L.Y. and make it FABULOUS! So, for the first Transformation Tuesday, I decided to makeover a lamp that has been in my bedroom for a loooonnnnngggg time. I am not talking since we moved in the new house a year ago, but it has followed for the last three places I have lived. I can't believe it has survived so long because I tire of things easily.


Well...here she is...
I have held onto this lamp forever because its look can be changed quite painlessly. It serves as an easel, so the plate can be changed to suit any space. It was working in the new bedroom because I found this palm tree plate. Well, why did I want to change it? It was cramping my style. I am OVER the plate!!! Plus, I stumbled upon another makeover lamp at the Goodwill to put where this one was (I will share that one soon).


As I was wandering around innocently in the glorious Kirklands this past Saturday there was this zebra print lampshade calling my name. It was luurve at first sight! There was a problem, however, I couldn't just buy the shade. It came with a lamp, and I was not prepared to spend $20 on a lamp and shade, when all I needed was the shade. Ugh...


So, I put my thinking cap on and went to Ross. I think best during retail therapy! :) I had spotted some zebra print plates there a while back, and I thought maybe I could use one with the lamp. Much to my dismay, they were all gone. This forced me to start thinking "outside of the box". I tell my students that ALL THE TIME. I really should practice what I teach!


I kept looking and all of a sudden, it HIT me. I saw chalkboard making, black spray paint, zebra print fabric, and some ribbon in my future.


I headed to Walmart and picked up a few things.


I made a chalkboard out of a $3 frame and some Chalkboard spray paint (I keep this on hand). Making the chalkboard is easy squeezy. I just take out the glass, paint it, pop it back in, and voila!


I painted the lamp with gloss, black spray paint for $1.


The lampshade was a bit more challenging. I bought the fabric for $1 and the ribbon for $2. I found a how to article here. I used Tacky Glue to adhere the fabric to the old shade, and then I simply tied a bow with some black ribbon for a finishing touch.


I am so in love with this lamp! I LOVE LAMP! It looks cauute in my Laundry Room. This is so much better than just changing out the plate. Thinking out of the box really does make a difference. Who knew? The best part is, the pricetag. Instead of spending $20 on a new lamp, I spent $7!


I am posting to this party.


Friday, July 23, 2010

Get Inspired

A few months ago I was at Kirkland's (one of my fav stores EVER) with my Mom. We were on the "first walk through" of the store. You must do atleast two walk throughs to make sure you don't miss anything on the first one! So anyway, I was looking through the pictures that were on sale, and I came across the cutest picture for the Laundry Room. I immediately started to picture it in my Laundry Room, and a vision came together. My Laundry Room was BORING, and maybe this wonderful wall art would make doing the laundry a little more tolerable. Well, probably not, but that's what I told myself.


So, you are thinking I picked it up, paid for it, and that was that? Not so much. I told my Mom that we would keep looking around, and if I still wanted it on the second walk through, I would buy it. So, we came back around (arms full) on the second trip, and it was G.O.N.E. Geez... What was I going to do? I now had this vision of a cranberry red Laundry Room with some zebra print, but no picture that inspired it all. So, I asked the salesperson if they had anymore. Of course not.
I sadly paid for my other treasures and walked out of the store with a frown on my face. JUST KIDDING!!! My Mom walked back over to where the pictures were and there it sat, pretty as a picture. WooooHoooo!!! It was coming home with ME. I don't know if it had something to do with me maybe mentioning to the cashier that I would probably put up a fight for this picture, but it reappeared.


Here is what all the fuss was about:


The matting gave me the idea to paint the room cranberry red. This has yet to happen, but it will very soon. I thought it would look great with some black shelves and zebra print.


I had a plan! A few days later, I was walking around Ross and I found these baskets.


I cut up some paint samples (the color I want to paint the room), and tied them on with zebra ribbon to label the baskets' contents.

Then, I remembered I had this one.


Nothing a little black spray paint couldn't fix. (I really need to fix the fabric...sorry.)


But, my shelves were white in the Laundry Room. What to do? Black spray paint...duh!


A few weeks later, the hubby and I were getting the house we own in Anderson ready to go on the market, and I found this cart we left there. It was white...black spray paint. I found the trashcan at Goodwill. It was a planter, but I painted it and voila!

This is what I have so far.


I can't wait to get some paint on the walls, and put a few final touches on it. The vision is definitely coming together. As far as having more fun doing the laundry...not the case.


Have you ever been inspired by an accessory?

Thursday, July 22, 2010

Reality Strikes


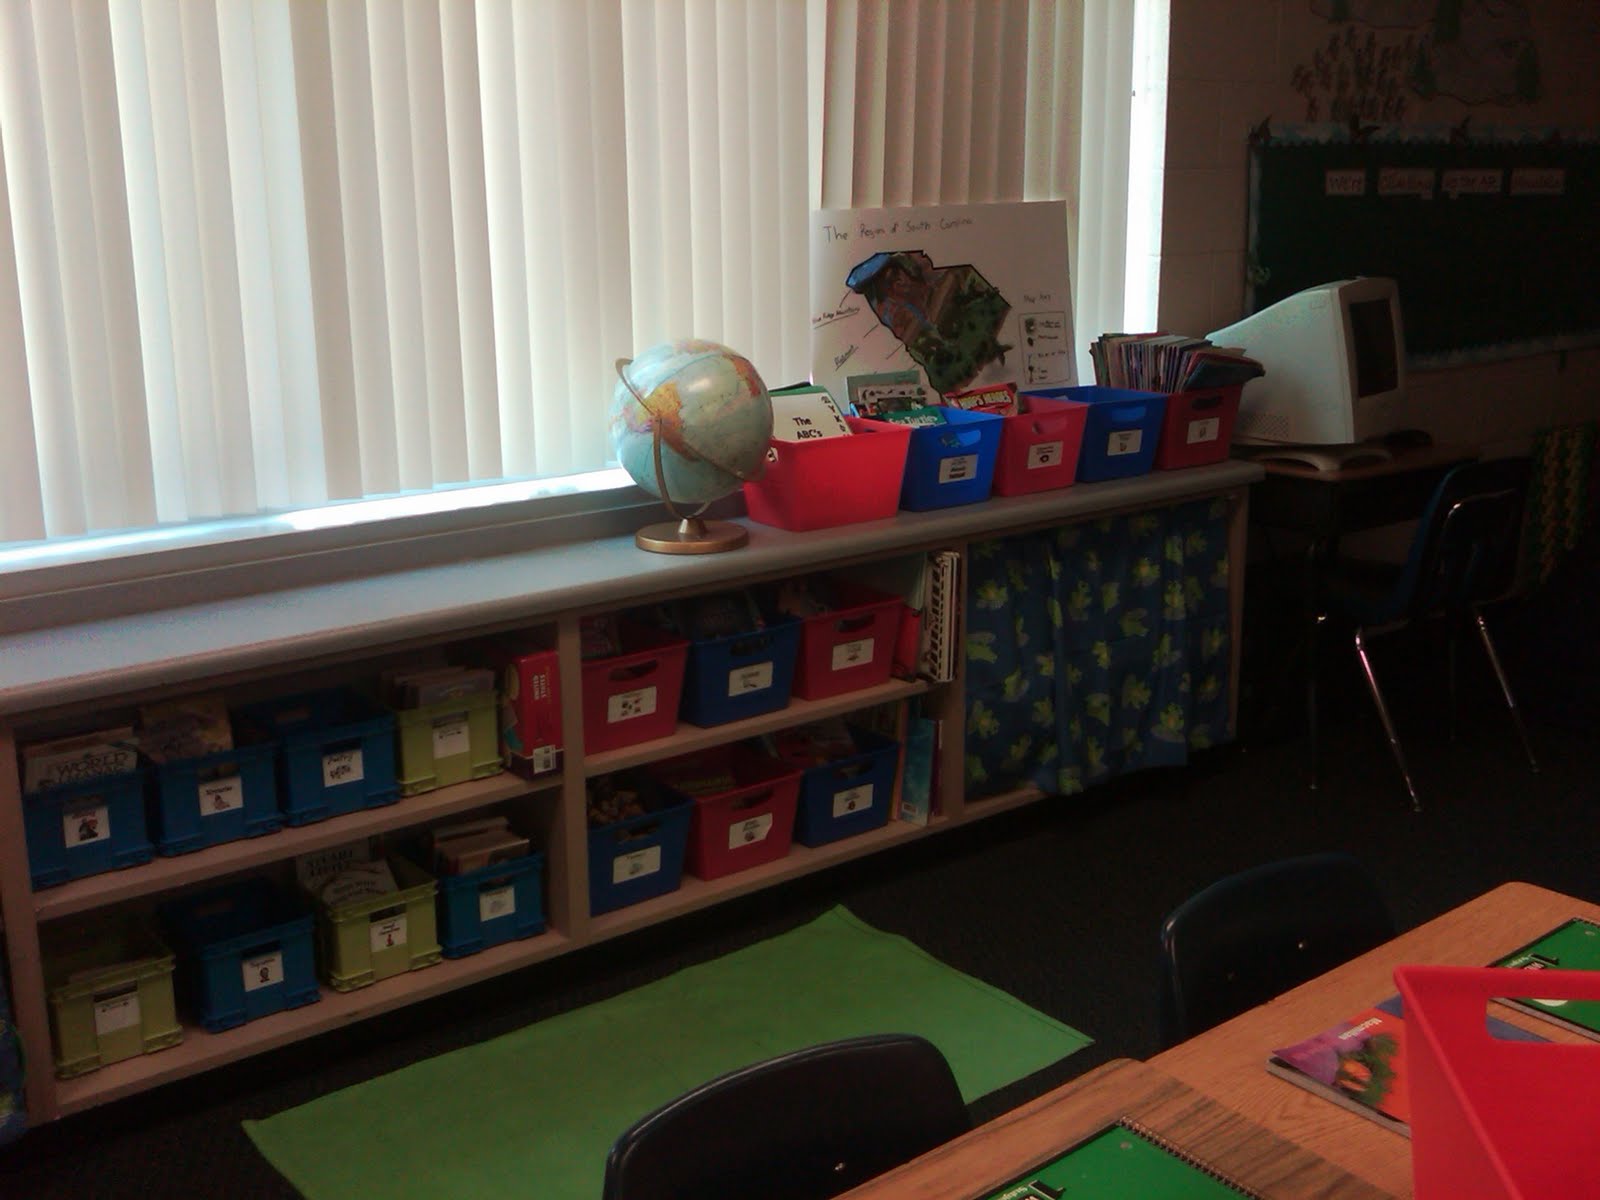
This is my reality...a classroom in disarray. I woke up this morning and decided that I should go ahead and get started on putting my classroom together. The above picture is what it looked like when I walked in. I wanted to just calmly shut the door and walk briskly (we don't run in the halls at school) back down the hallway, out the door, and get back in my car. I could have slipped right back out because I was the only crazy teacher on my hallway wanting to tackle such a daunting task. Not only did I see this crazy mess when I walked in, my classroom was also a cool 81 degrees. What fun, what fun!

I said to myself, "Self, do you really want to do this today?"

Myself replied, "Yes, once it's done, it's done."

So I went to work moving desks, chairs, computers, books, etc., etc., etc. The moving was NOT fun, especially since I was sweating. Joy...Joy!

As the time ticked by, the room really started to come together. I put the desks in groups of four first. Then, I put the teepee up in the reading center with a computer for AR and a place to add incentive charts later. This area is a big hit with my students every year. They love some teepee reading!!

My Mom helped me make the teepee my first year of teaching. It is made out of PVC pipe, craft wire, and wooden beads. She used a teepee pattern to sew the cover. I bought some floor pillows to put inside so it would be a cozy, comfortable place to sit and read. The camo netting was added later, after my husband visited the class for Veteran's Day.

Next, I was ready to put the writing center together.


I love, love, love this area. This is where the Writing Process can be seen in action. My students use the bubble map pocket chart to show me where they are in the process. They each have a card with their name on it, and they place it in the correct spot to let me know where they are in the process. This helps me keep up with where everyone is when I conference. It also helps me focus on those children who aren't moving and need my help.

I found the cubbies at Old Time Pottery for $5 each last summer. They are actually closet organizers. I took three pair and hooked them together. This is where editing materials, dictionaries, writing prompt cubes, pencils, journals, and Writer's Handbooks are housed. My students know where to find everything when they are working independently on a piece of writing, so I can focus on one student at a time. There is also and Editor's Checklist, State Writing Rubric, and posters for the six writing traits posted in this area. The "Umbrella Table" is a place where the students can write during independent writing time.

Next, enter SUPERNERD (that's me) to get the Technology Center ready!!! Oh how I absolutely love technology, or in the case of the computers in my classroom: Archaeology. I was ready to hook up some wires, climb under a table, and welcome the World Wide Web back into my classroom.


I can't wait to implement some new technology tools this year. My students are going to be blogging, social networking, emailing, skyping, typing, and much more. Yes, I did say social networking!! We will be using http://www.ning.com/ as a communication tool inside and outside of the classroom. It is like a private Facebook for the classroom. I can't wait to try it out with my students and parents this year. My students will also publish writing on our class blog here. I hope to use my new Hue Hd to Skype with another third grade class. I know that my students will be learning with technology every single day in my room!!! Woot Woot...it really makes me want to sing!

The last order of business was to organize the classroom library.

All of the storage containers came from Dollar Tree. Since I teach third grade, I have an assortment of picture books and chapter books. I use the larger bins for picture books and the smaller ones for the chapter books. A few years ago, I found some labels another teacher had made, here. I used shipping labels to print them on, and then I stuck them to the bins. They have been there for three years now, and they still look great!

So after a few hours of hot and sweaty work, I was finally finished. I was so happy to get it all done in one day! I thanked myself for talking me into it, then I took some final pictures.


Oh yes, I failed to mention the Promethean Board during my technology speech. Oh how I love her!!! She helps me keep my students actively engaged, she takes us around the world (Google Earth), and she helps me teach using...well you know...the T word.


Now my reality is that I don't have to work on this room for the rest of the summer. I can work on the rest of the beginning of the school year stuff right at home in my air conditioned office. I might also get a few more projects finished before school starts. Awesome Sauce!

Tuesday, July 20, 2010

Office Space Minus A Red Stapler

You might have wondered how we, the Sullivans, are getting light in the office nowadays since I stole the light fixture and repurposed it for the kitchen. Well, it was as easy as a little switcharo. The fixture in the kitchen was not quite as hideous as the one in the office, but it was not far behind. I can't say that I am a brass kind of girl.
So, the hubby took that one down, and guess what? It made friends with the best thing since sliced bread, a can of ORB spray paint. Does anyone think it is a problem that I keep atleast two cans of it on backup incase the store stops carrying it?


Ahhhh...that's much better. It fits the space perfectly.


Who thinks I could stop there? Well, I know myself pretty well, and I am here to tell you that it didn't stop with the light.


Here is what the office looked like when we bought the house.


This is after some paint and furniture (work in progress).


I wasn't a big fan of the furniture arrangement because everything was just lining the walls. The idea for this room was for it to be a nice, cozy place to work and read, since there's a whole lot workin' and readin' going on here in the Sullivan household. Its purpose is to also display the hubby's Marine Corps accomplishments and memrobilia...annnnnnndddd...to display some of my accomplishments.


I desperately wanted a comfy chair for reading in this space, but the money was just not in the budget to get one...untiiiillllll....I FOUND ONE FOR $35! Bliss!!!! An oversized Lane recliner that matched the room perfectly. So what's a girl to do? Buy it of course! As usual, I called the hubby to pick it up with the truck and bring it home. I couldn't wait to get it in the room and rearrange for a cozier feel.


This is how the room looks post light fixture change. I am absolutely loving the new change, for now.


There are still a few changes I want to make, but that is going to involve some major power tools and maybe a red stapler! My poor husband. I guess we should have included in our vows..."from tearing down to building it back"...hehe.

Hello Blogland....

While sitting at home this summer reading my favorite decorating blogs (more on those later) I decided to

dive in and start my own blog. I am a teacher, so this sitting around thing only happens every nine and a half

months. I am sure my husband is ready to get me a second job because everyday he comes home I have

changed something in our house. I get so B.O.R.E.D! I find myself standing in a room

thinking...hmmmmm...the whole office needs a revamp...I think that's what I'll do today. Except, a revamp

doesn't really mean rearranging furniture, in my crazy brain it means: move light fixtures, paint light fixtures,

paint the room, move all the furniture, add a new piece of furniture, paint the lamp, get a new lampshade,

scope out the Goodwill for accessories that can be transformed too. Oh geez...these ideas I get in my head.


Soooooooooo...here I am! Ready to share my ideas and document all of my changes in our home (how major

or minor they may become) on this little space I like to call Creative Carolina Charm. I hope that my

transformations and projects will give atleast one other person a creative boost. Maybe I will help another

B.O.R.E.D teacher scope out a thrift store and transform a tacky piece intoterrific piece.

What better way to kick off this whole blog thing than to share a project I decided to tackle this past week.

First, I have to tell you how this idea came about and give props. One of my favorite blogs to read

in all of blogland is Thrifty Decor Chick. I fell in love with this blog a while back and have since learned to be a

thrifty decorator using a little creativity. So this first project was definitely inspired by "Thrifty" after seeing

how she used a can of glorious ORB spray paint to paint a light fixture.

Enter first project here...


The Case of the Hideous Chandelier


Ok...so when we moved into our new house in August of 2009, there were some definite cosmetic changes that
had to be made. The first was the mustard colored walls that took over most of the 2700 square feet of our

home. OMG..it was awful, awful, awful. That got fixed RIGHT AWAY. However, one thing that I kept saying

needed a fix was the UGLY chandelier in the dining room, which is now an office. Well, here it is July 2010 and

said chandelier was still hanging in the office, ugh. Something had to be done.


Picture from: Oops! I craft my pants b/c I didn't take a before.


So with the hubby's help, I got to work. The chandelier was taken down from the office. I sang a little song! The

ORB came out of the paint cabinet, and I went to town. Wooooohooooo!!!! Then, I started looking for some

lamp shades and found that they were going to cost more than a new fixture...WHAT??? I was NOT okay with

that. I was bummed...so I visited the Goodwill, and what did I see after three seconds of walking in the door?

The exact shades I wanted...enter angels singing here! So I bought them for 50 cents each. Then, I went to

Walmart, spent two dollars on some ribbon, and this is what I came up with...


Dear kitchen table,

You are next!!!!

Love,
Me

About Me

My Photo
Mrs. Teachnology
I am a National Board Certified teacher in the great state of South Carolina. I am currently an Instructional Coach for a wonderful elementary school. I taught third grade for seven years and first grade for one year. I love everything having to do with technology, and I am excited to share my ideas with fellow teachers.
View my complete profile